
Before we begin
You can check out the completed repository and start developing your project right away:
Minimal Astro Starter Template with Netlify CMS
Astro
As a novice in web development, I am simultaneously overwhelmed and excited by the amount of front-end frameworks available. The majority of them, unfortunately, are not very beginner-friendly and require a lot of prior knowledge of JavaScript as well as TypeScript to get into. Since I have recently started learning JavaScript and don’t know anything about TypeScript, I found Astro to be the perfect choice for learning my first framework because it doesn’t require a lot of JavaScript knowledge (it’s philosophy is based around shipping static HTML sites with no JavaScript).
Besides being beginner friendly, Astro attracted me for the following reasons:
It offers a modular, island architecture, which enables us to decouple our code into different files which can’t create conflicts between themselves as they work in isolation. This implies that if one components of our site breaks down, the others are unaffected and load normally. This modularity, also, helps us organize our code more efficiently, which makes it easier to navigate in large code bases.
What also makes Astro a breeze to work with is the templating it includes out of the box with JSX (using JavaScript directly in HTML). The templating especially shines when we want to generate static pages (e.g. blog posts) from markdown files (Astro does the heavylifting by making the routing for us, we just need to provide either a .astro or .md file in the pages directory).
Since it is tedious and not user friendly for non-technical people to edit .md files in VS Code (or other markdown file editors) and push those changes to a git repository, we can use NetlifyCMS, which provides a polished UI, as a middleman for creating content and pushing those changes to our remote repository on GitHub (GitLab, BitBucket etc.).
Setting up the routing, folder structure and adding configuration file
We will be doing all the work in the /public and /src directories and their sub-directories.
📦public
 ┗ 📜robots.txt
📦src
┣ 📂components
┃ ┣ 📜BaseHead.astro
┃ ┣ 📜Favicon.astro
┃ ┣ 📜Fonts.astro
┃ ┣ 📜MetaTags.astro
┃ ┗ 📜Scripts.astro
┣ 📂layouts
┃ ┗ 📜BaseLayout.astro
┣ 📂pages
┃ ┗ 📜index.astro
┗ 📂styles
┃ ┗ 📜global.cssRouting in Astro
Astro lets us set up routing for our pages very easily:
We create a file or folder in the /src/pages directory and it automatically generates a route for us. For example, if we want to create a page with the URL www.example.com/blog/, we add the file blog.astro (all Astro pages, components and layouts need to have the .astro extension) in /src/pages.
Creating the /admin route
In order to access Netlify CMS, authenticate, review and create new content, we need to create a page on our website with an /admin route.
Following the principle from the explanation above, we generate the /admin route by adding a new admin folder in the /src/pages directory. Then, to create the actual page, we create an index.astro file in /src/pages/admin where we will put our code.
The file structure in the /src/pages directory should look like this after adding the admin folder and the index.astro file:
📦pages
 ┣ 📂admin
 ┃ ┗ 📜index.astro
 ┗ 📜index.astro
Adding the config.yml file
In order to set up Netlify CMS, we need to add a configuration file in the YML format, where we can specify all the settings for our CMS. This file is the core of Netlify CMS, which means that our application must include it.
The configuration file needs to be in the /public directory because that’s where Astro stores all the static assets (the file should remain untouched by Astro and served to the client as we originally wrote it).
For now, we create an /admin directory in the /public directory and nest a config.yml file in it.
After finishing the step above, our /public directory should look like this:
📦public
┣ 📂admin
┃ ┗ 📜config.yml
┗ 📜robots.txt
We will fill out the config.yml file and set up our CMS in the next steps. For now we just leave it as it is.
Creating an uploads folder for media
As previously mentioned, we can find all the static assets for our site in the /public directory. Since images are static assets, we need to upload them to the /public directory as well.
We create an /images directory and nest another one called /uploads, which is where we will store all the images we upload with Netlify CMS.
The updated /public directory should look like this:
public
 ┣ 📂admin
 ┃ ┗ 📜config.yml
 ┣ 📂images
 ┃ ┗ 📂uploads
 ┗ 📜robots.txt
We will connect our CMS with the /images/uploads directory when we set up our config.yml file.
Recap of what we’ve done so far
We set up the /admin route in the /src/pages directory.
We created the config.yml file in the /public/admin directory.
We nested the uploads folder in the /public/images directory.
The updated /public and /src/pages directories should look like this:
public
 ┣ 📂admin
 ┃ ┗ 📜config.yml
 ┣ 📂images
 ┃ ┗ 📂uploads
 ┗ 📜robots.txt
📦pages
┣ 📂admin
┃ ┗ 📜index.astro
┗ 📜index.astroUpdating the files
Updating /src/pages/admin/index.astro
Before we begin adding all of the files needed to build Netlify CMS and authenticate the users, we need to add a basic HTML5 boilerplate.
<!DOCTYPE html>
<html>
  <head>
    <meta charset="utf-8" />
    <meta name="viewport" content="width=device-width, initial-scale=1.0" />
    <title>Content Managment System</title>
  </head>
  <body></body>
</html>
First, we need to include the script that is used to build Netlify CMS at the bottom of the body section:
<!DOCTYPE html>
<html>
  <head>
    <meta charset="utf-8" />
    <meta name="viewport" content="width=device-width, initial-scale=1.0" />
    <title>Content Managment System</title>
  </head>
  <body>
    <script
      src="https://unpkg.com/netlify-cms@^2.10.192/dist/netlify-cms.js"
      is:inline
    ></script>
  </body>
</html>
💡 Don’t forget to include the is:inline template directive, as it is used to tell Astro not to optimize and modify the script during the build step. More on template directives.
Now we need to link the config.yml file with Netlify CMS in the head of the index.astro file:
<!DOCTYPE html>
<html>
  <head>
    <meta charset="utf-8" />
    <meta name="viewport" content="width=device-width, initial-scale=1.0" />
    <title>Content Managment System</title>
    <link href="/admin/config.yml" type="text/yaml" rel="cms-config-url" />
  </head>
  <body>
    <script
      src="https://unpkg.com/netlify-cms@^2.10.192/dist/netlify-cms.js"
      is:inline
    ></script>
  </body>
</html>
💡 Make sure to include the type and rel attributes in the link element. Otherwise the documents will not be linked properly.
Finally, we need to add the Netlify Identity Widget in the head of the index.astro file which does the authentication of users.
<!DOCTYPE html>
<html>
  <head>
    <meta charset="utf-8" />
    <meta name="viewport" content="width=device-width, initial-scale=1.0" />
    <title>Content Managment System</title>
    <link href="/admin/config.yml" type="text/yaml" rel="cms-config-url" />
    <script
      src="https://identity.netlify.com/v1/netlify-identity-widget.js"
      is:inline
    ></script>
  </head>
  <body>
    <script
      src="https://unpkg.com/netlify-cms@^2.10.192/dist/netlify-cms.js"
      is:inline
    ></script>
  </body>
</html>
Updating /src/pages/index.astro
Since we are using a layout for the main index.astro file, we have to update that file and its components instead of adding code to the file directly. We can find the layout at /src/layouts/BaseLayout.astro.
In the BaseLayout component we find linked the BaseHead and Scripts components.
First, we update the BaseHead component, which can be found at /src/components/BaseHead.astro, with the Netlify Identity Widget script.
<meta charset="UTF-8" />
<meta http-equiv="X-UA-Compatible" content="IE=edge" />
<meta name="viewport" content="width=device-width, initial-scale=1.0" />
<title>Site name</title>
<script
  src="https://identity.netlify.com/v1/netlify-identity-widget.js"
  is:inline
></script>
Then, we update the Scripts component, which can be found at /src/components/Scripts.astro, with some JavaScript code that helps with the redirecting of the users during the authentication proccess.
<script is:inline>
  if (window.netlifyIdentity) {
    window.netlifyIdentity.on("init", (user) => {
      if (!user) {
        window.netlifyIdentity.on("login", () => {
          document.location.href = "/admin/";
        });
      }
    });
  }
</script>
Configuring the CMS with config.yml
To configure Netlify CMS, we need to specify the settings according to our needs in the config.yml file.
We can find the config.yml file at /public/admin/.
Configuring the backend
We specify the authentication method for our CMS as well as the git branch for pushing our content.
For authentication we use Git Gateway, which is “an open source API that acts as a proxy between authenticated users of your site and your site repo.” (Source: Netlify CMS)
As far as the branch used for pushing the content goes, it can be any branch in our repository. In our case, however, we use main as the branch to push our content to.
So, we update the config.yml file:
backend: # The two following lines need to be indented
  name: git-gateway # The authentication method we use for Netlify CMS
  branch: main # Branch to update when we push our content (it can be any branch in our repo)
Configuring the media folder
We need to specify two paths in order to configure the folder used for media uploads.
The first one specifies the exact path where Netlify CMS should store our uploaded files.
The second one specifies the path without /public preceding it, as all the static assets are stored in the root directory after the build step.
backend: # The two following lines need to be indented
  name: git-gateway # The authentication method we use for Netlify CMS
  branch: main # Branch to update when we push our content (it can be any branch in our repo)

# Do not indent these lines
media_folder: "public/images/uploads" # Exact path where we store the uploaded media
public_folder: "/images/uploads" # We do not need to specify the /public part as all the files from it are stored in the root directory after the build step
Specifying the URL of the website
Netlify CMS needs to know the site of our URL for various functionalities (e.g. creating preview links or updating the UI with relevant links for easier navigation).
backend: # The two following lines need to be indented
  name: git-gateway # The authentication method we use for Netlify CMS
  branch: main # Branch to update when we push our content (it can be any branch in our repo)

# Do not indent these lines
media_folder: "public/images/uploads" # Exact path where we store the uploaded media
public_folder: "/images/uploads" # We do not need to specify the /public part as all the files from it are stored in the root directory after the build step

site_url: https://astro-netlifycms.andrijan.xyz/
display_url: https://astro-netlifycms.andrijan.xyz/
Adding a custom logo
When the users are authenticating, the logo defaults to Netlify’s logo. However, we can change that logo and add our own by providing a link to an image in our repository:
backend: # The two following lines need to be indented
  name: git-gateway # The authentication method we use for Netlify CMS
  branch: main # Branch to update when we push our content (it can be any branch in our repo)

# Do not indent these lines
media_folder: "public/images/uploads" # Exact path where we store the uploaded media
public_folder: "/images/uploads" # We do not need to specify the /public part as all the files from it are stored in the root directory after the build step

site_url: https://astronetlifycms.andrijan.xyz
display_url: https://astronetlifycms.andrijan.xyz

logo_url: /images/logo/logo.png
Creating collections
With collections, we can organize our data better in the CMS and specify the type of content we want to enter for each collection. Read more on collections in Netlify CMS.
If we have different types of content for our website, we can define a separate collection for each type. For example, we can have a one collection for blog posts, another collection for events or even another for products that we are selling.
From each of those collections we can gather different types of data by adding specific fields (numbers, strings, dates, images etc.) according to our needs.
For each collection we create, we first need to add some general information about it (the name, the labels, the folder where new posts should be saved). Then, we need to specify the fields for each collection. Each field consists of a label, a name and a widget. Read more on widgets.
Below there is a very basic collection for blog posts:
backend: # The two following lines need to be indented
  name: git-gateway # The authentication method we use for Netlify CMS
  branch: main # Branch to update when we push our content (it can be any branch in our repo)

# Do not indent these lines
media_folder: "public/images/uploads" # Exact path where we store the uploaded media
public_folder: "/images/uploads" # We do not need to specify the /public part as all the files from it are stored in the root directory after the build step

site_url: https://astro-netlifycms.andrijan.xyz # Replace with site's URL
display_url: https://astro-netlifycms.andrijan.xyz # Replace with site's URL

logo_url: /images/logo/logo.png # Replace with path to logo

slug: { { slug } } # The URL should be the name of the title of the post/document

collections:
  - label: posts # Label used in the UI for the collection
    label_singular: post # Label for singular post
    name: posts # Name of the collection used for various functionality in the CMS
    folder: /src/pages # Where each new post with .md should be saved
    create: true # Allows users to create new items in the collection
    fields:
      - { label: "Title", name: "title", widget: "string" } # Field Title
      - { label: "Description", name: "description", widget: "markdown" } # Field Description
      - { label: "Date of writing", name: "date", widget: "DateTime" } # Field Date of writing
      - { label: "Featured image", name: "featuredImage", widget: "image" } # Field Featured Image
Setting up Netlify Identity and inviting users
In this section, we will assume that we have already connected our git repository to Netlify and that our site is live.
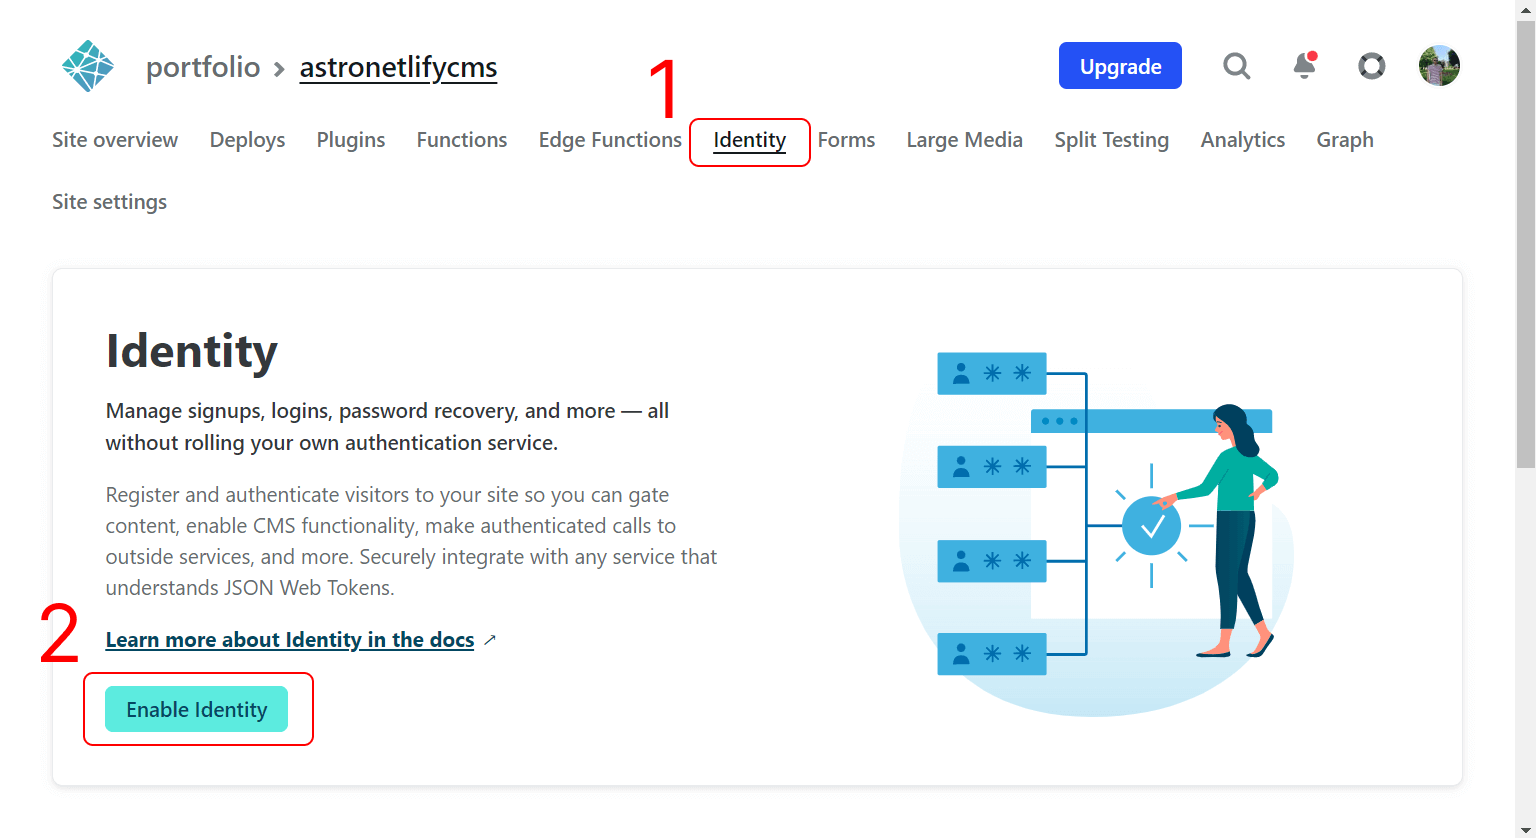
Activating Netlify Identity
In order for our users to be able to authenticate themselves, we need to activate the Netlify Identity widget on Netlify.
To activate Netlify Identity, we click on the Identity tab. Once we open it, click on the Enable identity button.
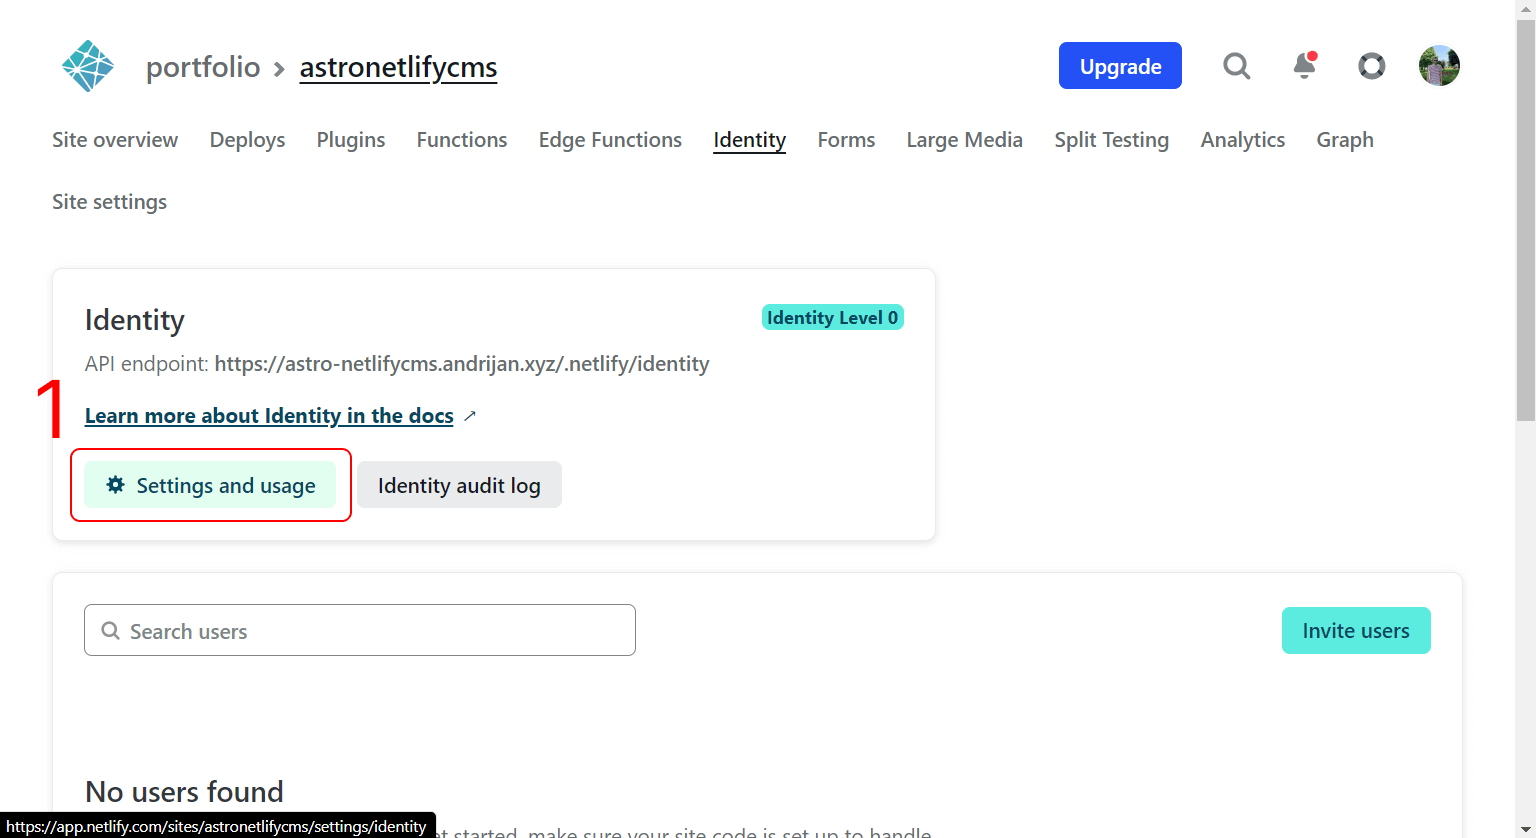
Opening the settings for Netlify Identity
To access the settings for Netlify Identity, we need to click on the Settings and Usage button.
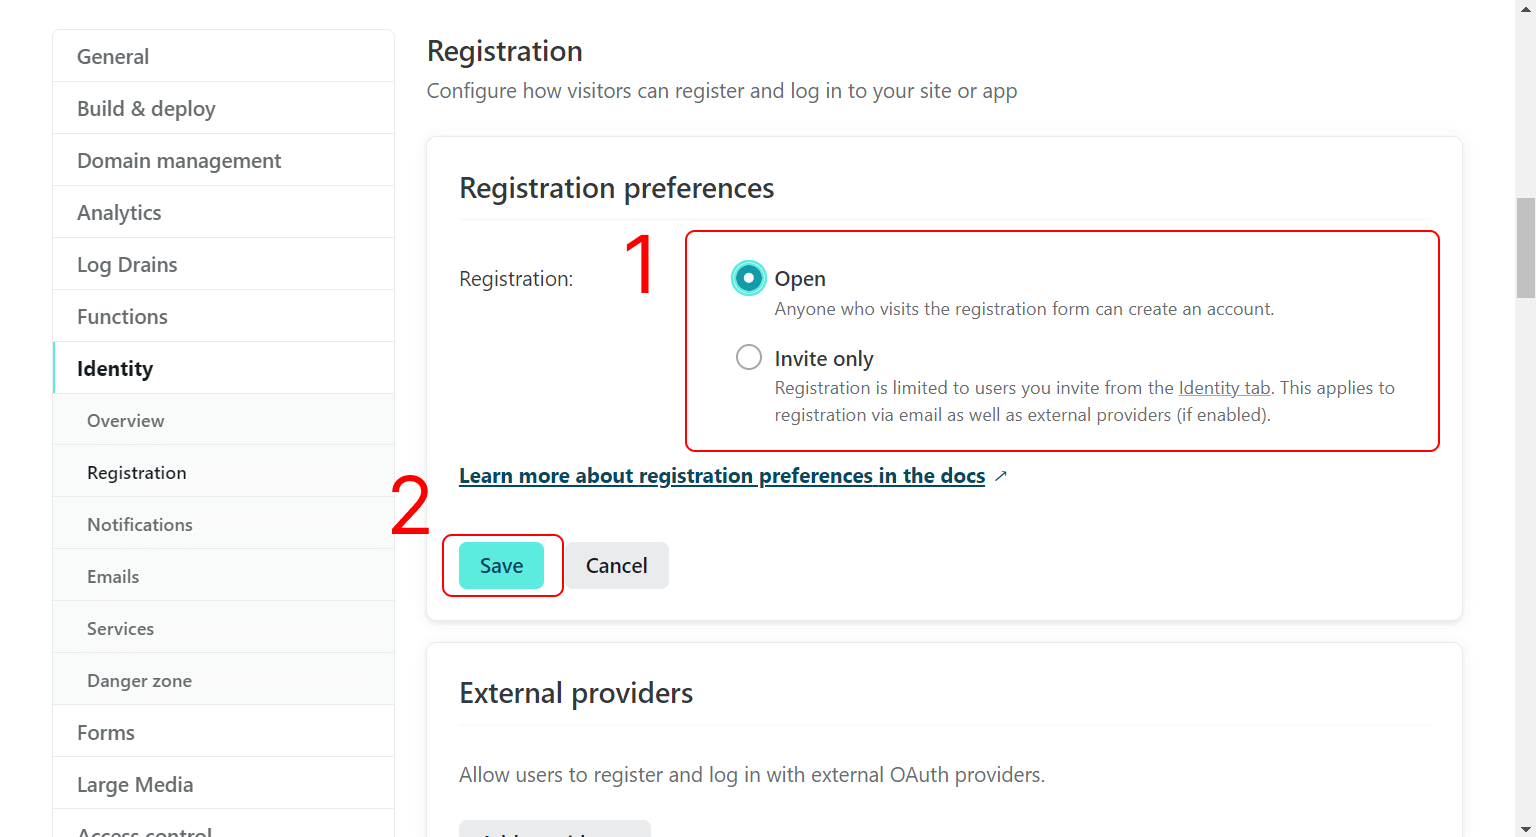
Setting up the registration preferences
There are two options when it comes to the registration process with Netlify CMS. Namely, we can let users create accounts themselves, or we can disable registration and invite the users ourselves.
Once we open the settings page for Netlify Identity, we scroll down to the Registration preferences section and decide between Open or Invite Only type of registration. Then we save the setting we choose.
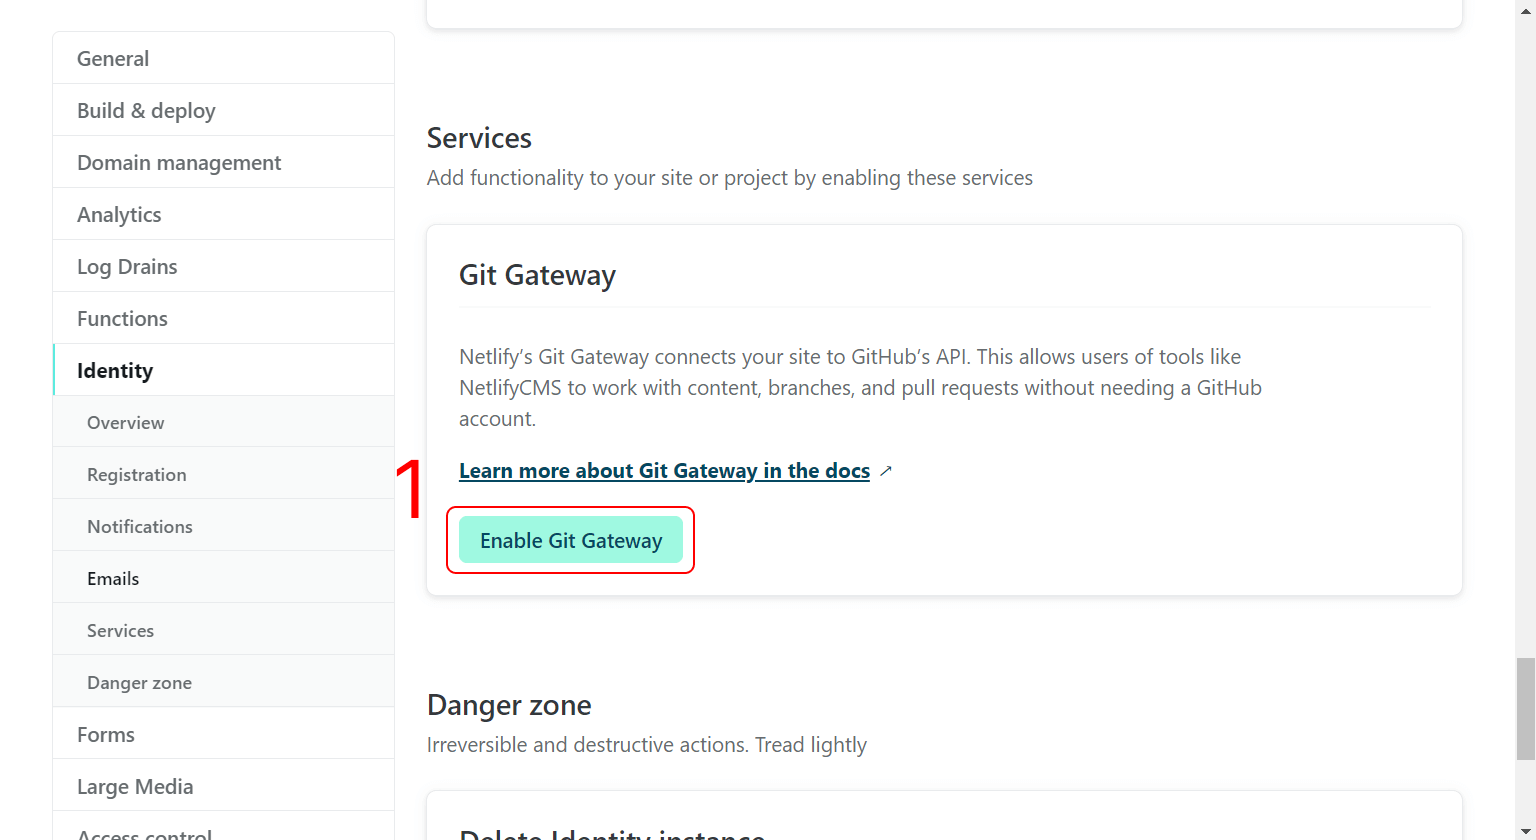
Enabling Git Gateway
We have previously set up Git Gateway for our backend in the config.yml file, now we just need to activate it on Netlify as well.
To do so, we scroll further down the page until we reach the Git Gateway section and then we click on the Enable Git Gateway button.
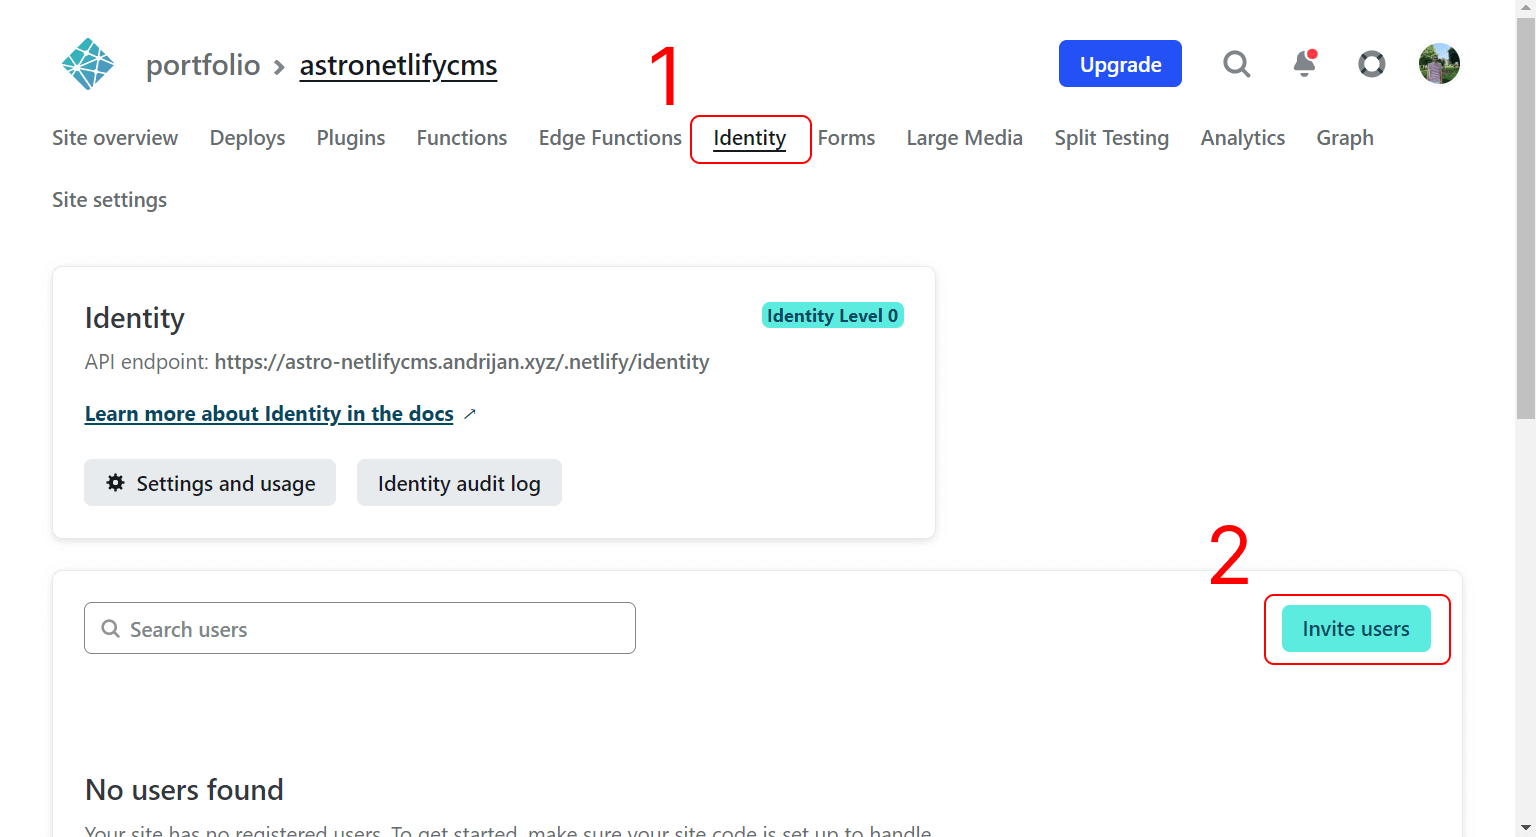
Inviting users
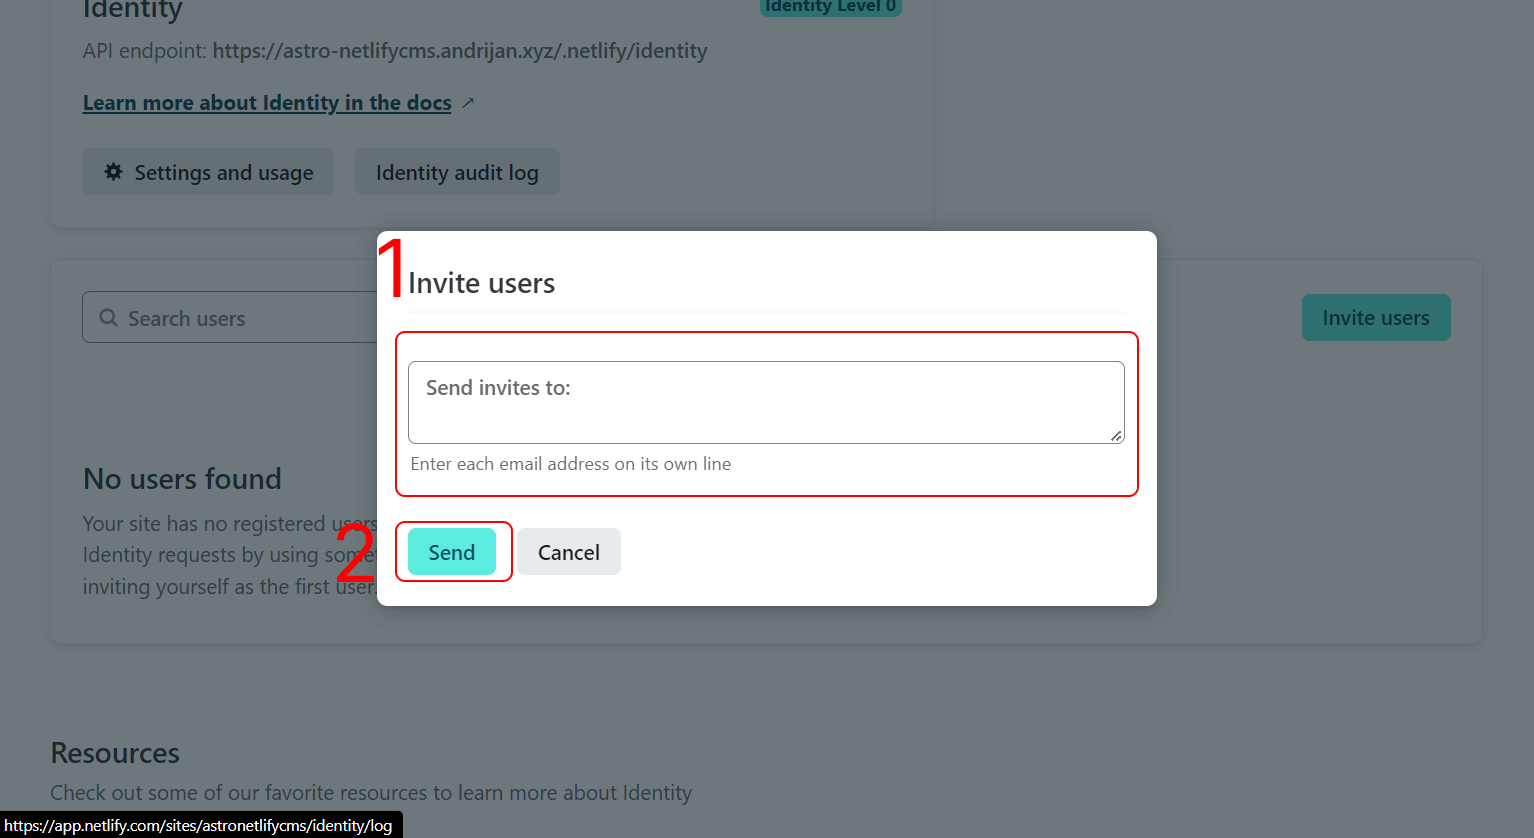
To invite users to Netlify CMS, we need to once again click on the Identity tab, scroll down and click on the Invite users button.
Then, in the modal window, we just enter the emails of the users we want to invite and click on the Send button to send them an invitation.
💡 On the free Netlify plan, we can invite up to 5 users.